How to implement an mParticle data plan in an eCommerce app
This sample application allows you to see mParticle data events and attributes displayed in an eCommerce UI as you perform them, and experiment with implementing an mParticle data plan yourself.
Effective cross-functional data planning is a great way to ensure data quality throughout the data lifecycle, and avoid time-intensive debugging for data engineers. In this article and video, respectively, we covered how to create data plans using the mParticle Data Plan Builder, and leverage mParticle’s Live Stream to debug data errors before they reach your downstream systems.
However, between developing a data plan and validating incoming data lies a crucial step that falls squarely on the shoulders of engineers: Implementing data collection. Without effective tools to aid in implementation, writing data collection code can be an error-prone time sink for technical teams.
In many scenarios, developers find themselves needing to translate a static data plan into production code. This not only diverts engineering cycles away from core objectives––it increases the likelihood of data collection errors as well. It is easy to imagine how a hyphen in the data plan could inadvertently be written as an underscore in the code, for example. Once this error is discovered further along in the ETL pipeline, data engineers will be called upon to track down its origin and correct the source code.
Luckily, mParticle’s Data Planning tools and templates eliminate these problems by giving developers the resources to implement data collection efficiently, accurately, and consistently across platforms. In this article, we’ll use this eCommerce sample application as our development environment to demonstrate implementing an mParticle data plan using the Data Plan Builder and the Snippet tool. Additionally, we’ll talk through some of the choices we made in creating the sample app itself, which we hope you'll find to be a helpful playground as you learn more about implementing data collection.
Implement data collection with mParticle’s Data Planning tools
Step 1: Create a data plan
Before we implemented data collection, we needed a data plan to work from. Using mParticle’s retail data plan template (which is one of six vertical-specific templates that our Data Plan Builder provides), we instantly had a set of retail-specific identities, events, and attributes defined for us to start with.
Step 2: Turn the data plan into JSON
From there, we could use the Data Plan Builder’s built-in script to automatically translate the data plan (as defined in the tabs of the Google Sheet) into machine-readable JSON:
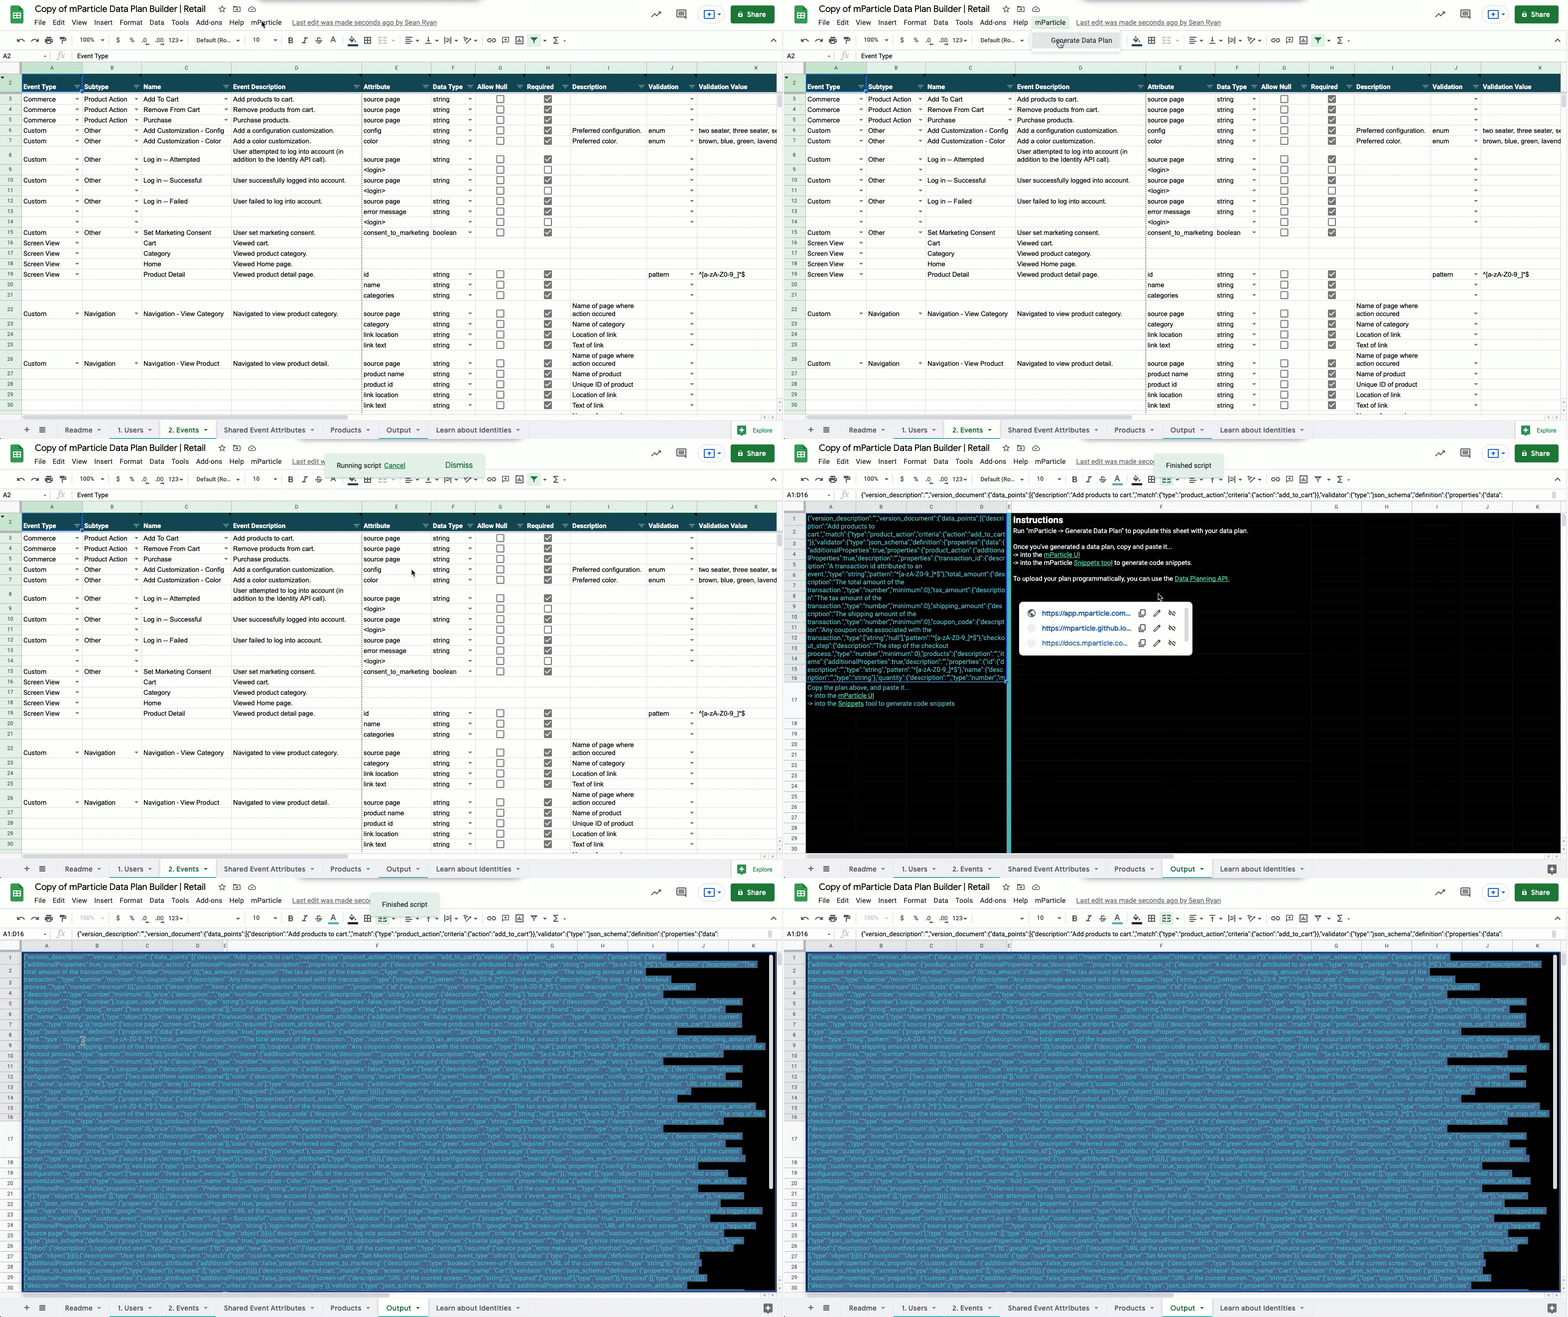
Step 3: Automatically generate event collection code
With this JSON in hand, we used the mParticle Snippet tool to automatically generate the data collection code that we would implement in our application. This Snippet tool’s interface immediately represents each event in the data plan as a discrete code block that can be transported directly into your source code:
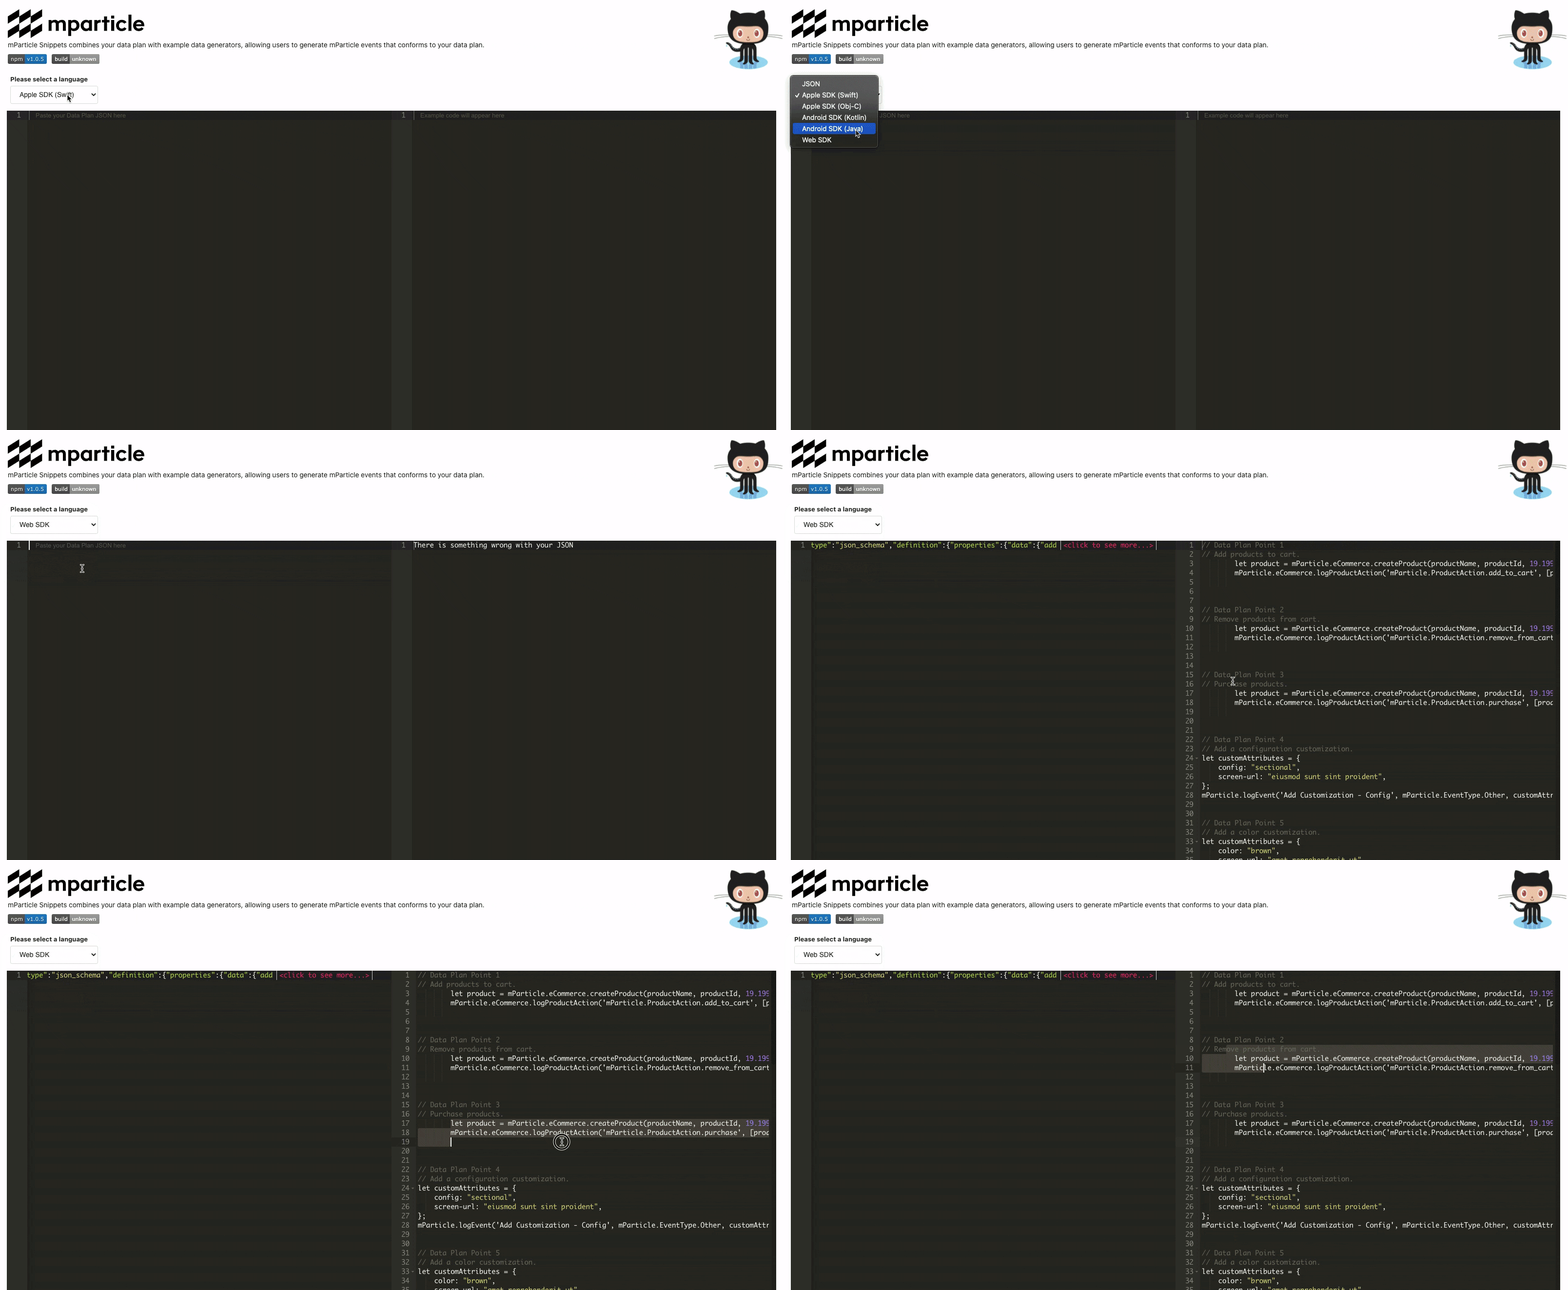
In this case we used the “Web SDK” option (which outputs JavaScript). As you can see in the example above, the interface also supports code generation for iOS (Swift and Objective-C) as well as Android (Kotlin and Java). Since the Snippet tool generates this code directly from the JSON representing the data plan, it eliminates many of the errors that commonly arise when manually translating data plans into code––for example, misspelling attribute names or using incorrect data types.
Additionally, having a tool capable of generating data collection code across major platforms from the same JSON source addresses another significant challenge of implementing a data plan: Maintaining consistently across data inputs. This can be especially challenging at large enterprises with a variety of touchpoints, where it is common to have separate engineering teams handling Web, iOS, Android and OTT products.
Step 4: Implement events throughout the application
While the Snippet tool does the work of generating the event collection code, we still have to implement these events throughout the application using the appropriate user-based triggers to fire them.
Many of our commerce events in this application are tied to users viewing or customizing products. Since we’re using a component-based architecture with React, our application has one template, ItemView.js, that we use to dynamically display each individual product to the user. Therefore, we only had to implement each product-related event once on this page for it to work for each product the site displays.
For example, let’s look at how we implemented the Product Detail event, which sends three attributes, id, name, and categories, to mParticle:
useEffect(() => {
     // isBrowser refers to a variable that checks whether the window object is defined
    if (isBrowser) {
      let customAttributes = {
        id: props.pageContext.content.id,
        name: props.pageContext.content.name,
        categories: props.pageContext.content.categories
      }
      // Log event to mParticle
      window.mParticle.logPageView("Product", customAttributes)
      // Display event properties in UI
      toast(
        <ToastSuccess
          eventName="Product"
          eventCategory="Screen View"
          product={customAttributes.name}
        ></ToastSuccess>,
        {
          position: toast.POSITION.TOP_RIGHT,
          className: "success-toast",
        }
      )
    }
  })
Since we wanted this event to run each time the user views a new product, we placed it inside the useEffect hook, which will automatically run each time the component renders. Inside useEffect, we initialize an object called customAttributes which we use to store the event attributes: id, name, and categories. We then pass these attributes as the second argument to logPageView, which forwards this event along to mParticle.
How we built this data planning sample app
What tools did we use?
We bootstrapped our data planning sample app with this Jamstack starter template, which provides an out-of-the-box retail user interface built on React, Next.js, and Gatsby. Since most developers working on eCommerce products today leverage these tools or similar component-based frameworks, we felt this stack would be ideal for showcasing this process.
Displaying events in the user interface
As you browse through the live deployment of this user interface, you will see notifications appear in the top-right corner of the as you take actions including:
- Viewing different product pages
- Customizing the color/configuration of products
- Adding or removing products from your cart
- Selecting a username
- Changing your marketing consent status
- Purchase the items in your cart
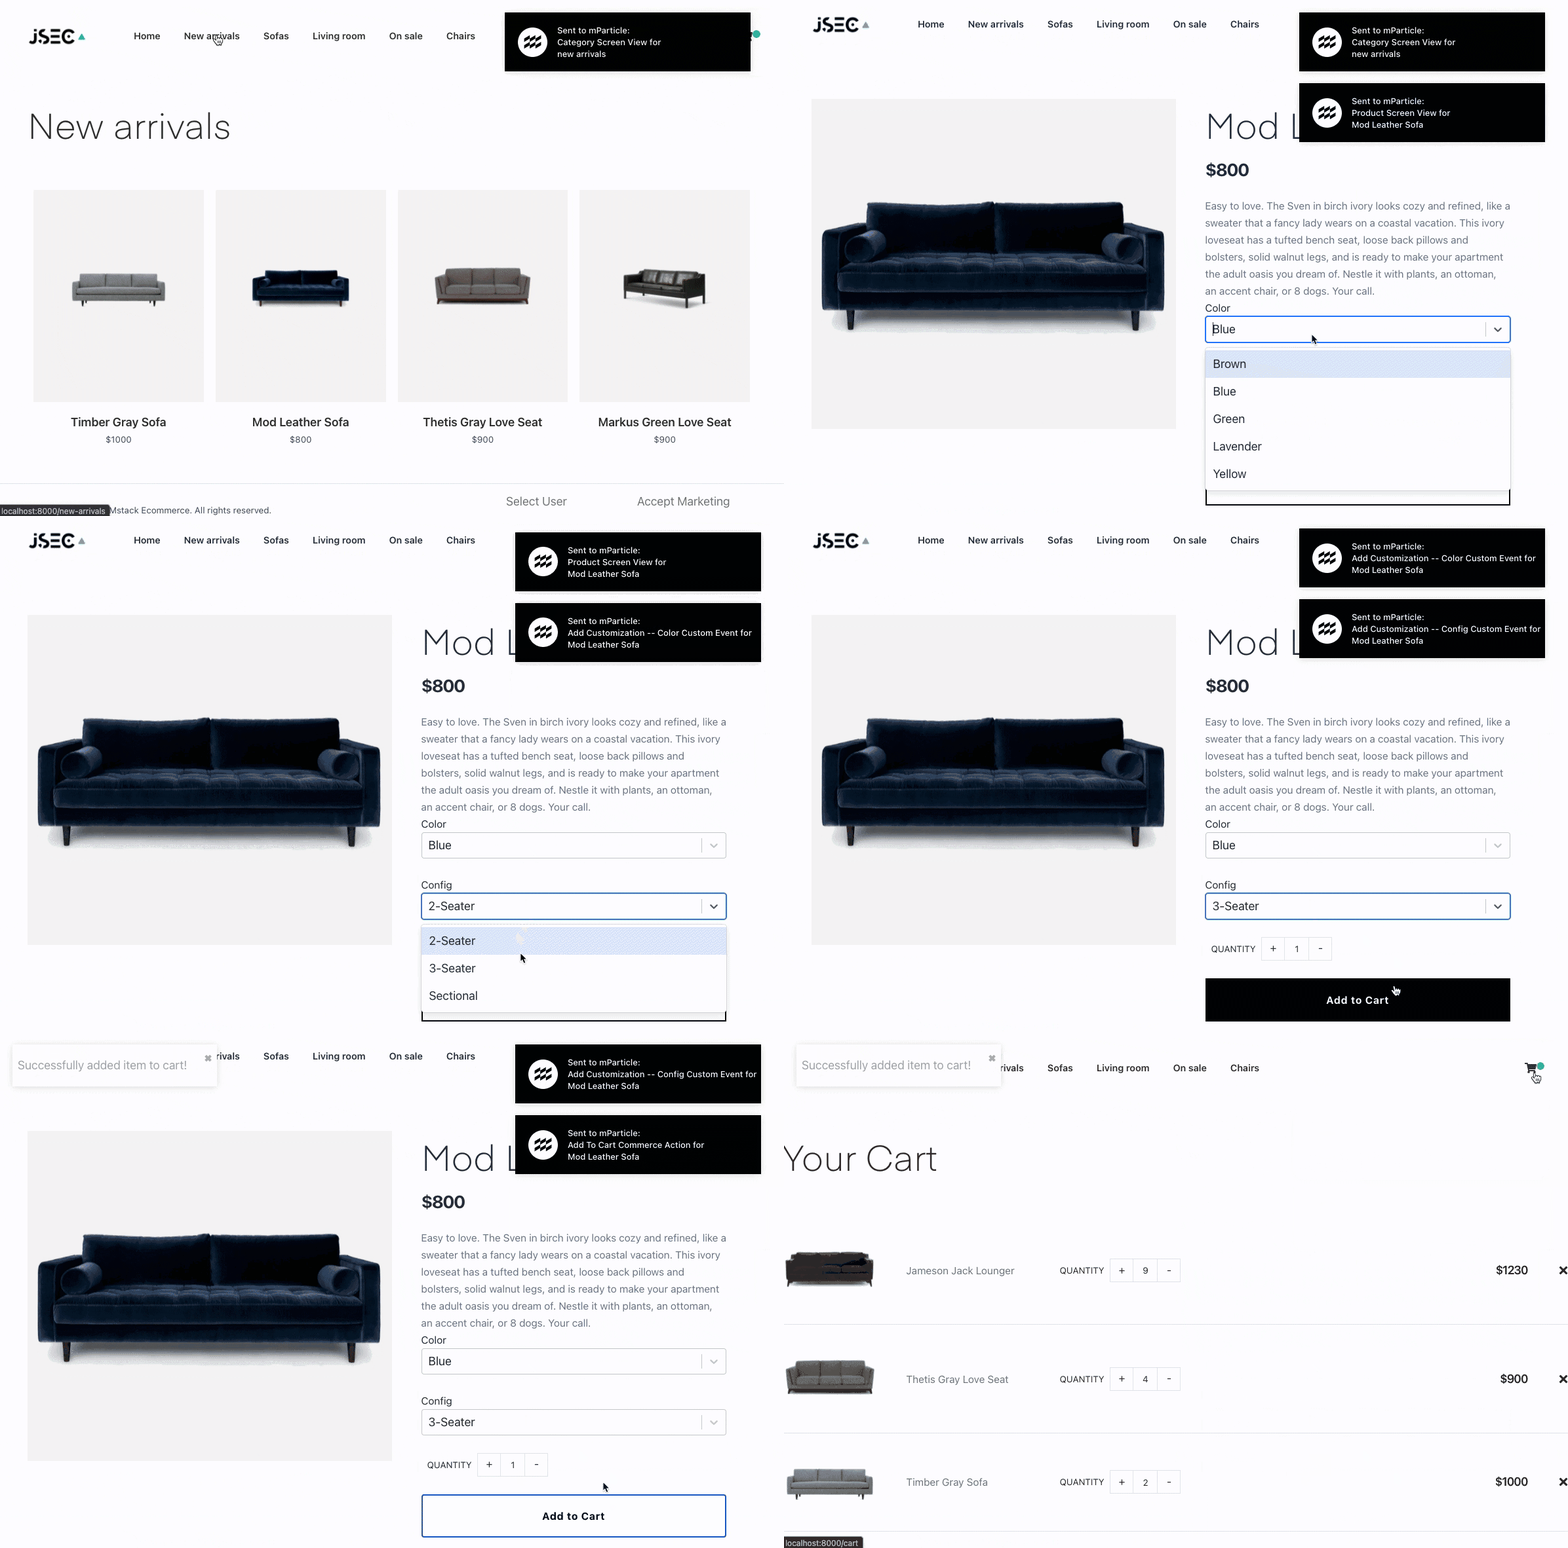
To add this feature, we used React Toastify, an awesome and easily customizable React package for adding notifications to a user interface. Each time we log an event in our sample app, we make a call to toast, passing in our custom-made notification component as the first argument, and an object containing some styling information as the second:
toast(
        <ToastSuccess
          eventName="Product"
          eventCategory="Screen View"
          product={customAttributes.name}
        ></ToastSuccess>,
        {
          position: toast.POSITION.TOP_RIGHT,
          className: "success-toast",
        }
      )
Experiment with this sample app using your own mParticle workspace
We invite you to experiment with this application and the Data Plan Builder and explore how you can easily build and implement data plans that capture the customer events and user identities that matter to your business.
Tools/Resources discussed in this post:
