Test in production with mParticle and Split
Testing with production data allows you to release features with more efficiency and greater confidence, but doing it successfully requires good testing control and data management processes. Learn more about using mParticle and Split feature flags to simplify testing in production.
This article was updated on June 30th, 2021
Gaining a greater understanding of your product by continuously testing is extremely important to delivering stable and innovative user experiences. Specifically, testing in production, as opposed to testing in staging environments, allows you to run experiments in the exact environment that customers are engaging in, helping you test more thoroughly, ship products with greater confidence, and maximize the effectiveness of each cycle. This blog will walk through how you can get started with testing in production and how you can use mParticle and Split together to maintain control of your customer data while testing.
What is testing in production?
Testing in production is testing your features in the production environment that they will live in once released. In comparison with staging or QA environments, where testing was traditionally done, the production environment, where users engage, often contains additional complex systems and data sets that staging does not. Approving a feature after testing in production, therefore, ensures that the feature is much less likely to cause any unforeseen bugs or crashes, because it has already been exposed to all variables that it will encounter when live. Furthermore, as Split’s Talia Nassi notes in “A Break up letter to staging,” testing in staging can be extremely expensive and inefficient, and staging environments can be painful to maintain.
How do you test in production?
The key to testing in production is feature flagging.
Feature flags are if/else statements that define the code path of a feature. They provide the ability to deliver variant product experiences to certain user groups while continuing to deliver an unchanged product experience to others within the production environment. When testing, you can use feature flags to deliver a test feature to a controlled group of target users, such as internal developers, product managers, testers, designers, and automation bots while continuing to deliver your published product experience to customers. If there is a bug detected by the internal group while testing, no users outside of the group will be impacted. Once your feature has been tested and is ready to push live, you can opt-in the rest of your customer base so that they can see the same updates as your testing group.
Using feature flagging, you’re able to test in production much more easily and ultimately ship new features with greater confidence. With testing tools such as Split, feature flags can be switched on/off with a simple toggle, enabling you to run tests in your application without writing any code.
For more, check out these 5 best practices for testing with feature flags in production from Split.
What are the keys to testing in production successfully?
Design your tests
Once you’ve set up your feature flags and are ready to start testing in production, it’s important to make sure you design your test strategically so that you can run it continuously and at production scale. The best way to test successfully is to follow these three core steps:
1. Model your data
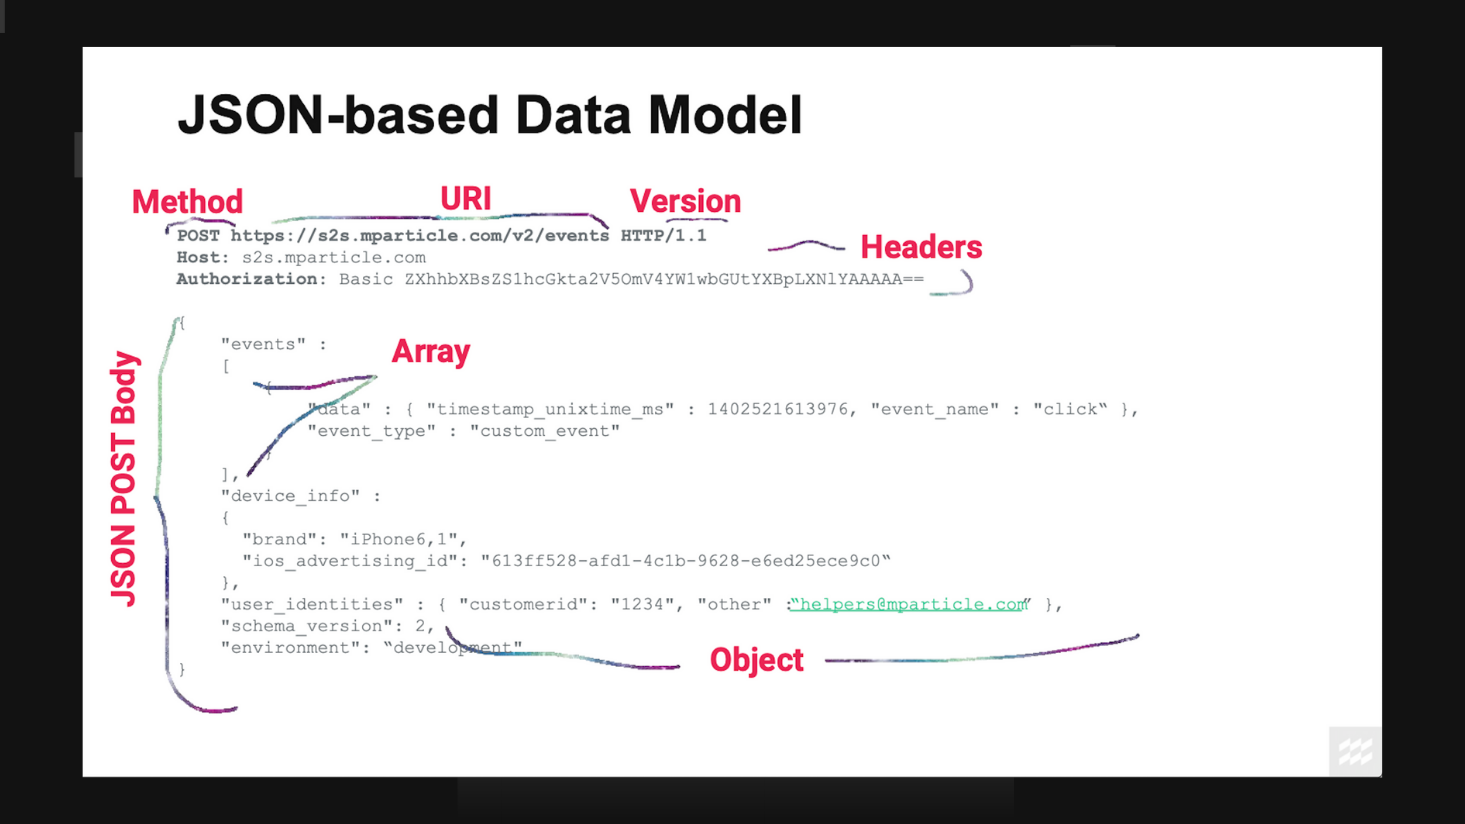
The first step of testing in production is understanding your test data. When testing, it’s important to ensure that your data follows a standard data model format so that you can isolate and modify specific variables. For example, if you’re using a JSON-based data model, ensure that your model includes the Method, Headers, and Array and Object within the JSON POST Body.
2. Create a data plan
Once you’ve got your test data model, you can make modifications using a data plan. By altering specific variables, you can manipulate test data by specific degrees programmatically and run the results at scale.
<Request MaxAttacks=“3”>
   <Method AttackSet=“AttacksA” Probability=“5%” MaxAttacks=“1”/>
   <URI>
     <Host Probability=“0%” />
      <Path AttackSet=“AttackSetPath” Probability=“10%” MaxAttacks=“2”/>
      <QueryLine AttackSet=“Values” Probability=“50%” MaxAttacks=“2”/>
   </URI>
   <Headers KeyChance=“2%” KeyAttacks=“AttacksA” ValueChance=“25%” ValueAttacks=“Values” >
      <Authorization KeyChance=“0%” ValueChance=“10%” />
   </Headers>
   <Cookie KeyChance=“2%” KeyAttacks=“AttacksA” ValueChance=“25%” ValueAttacks=“Values” />
</Request>
3. Run the results through an Oracle
After running your test, how do you know if you’ve found something? Whether you’re looking for specific metrics, logs, crashes, or side effects, you’ll know if you’ve found something significant, and whether it’s good or bad, by using an Oracle. An Oracle looks at your test data, and based on the variation results, determines whether the test succeeded or failed. For example, if you run a test allowing for an HTTP 500 error count of 1% and your error counter shows below .1%, your Oracle can determine this is not a significant problem and the test is a success. If the error counter were to show 5%, however, the Oracle would determine that this is a significant problem, and that an alert should be triggered or the test should fail.
Granular user data management throughout the pipeline
In addition to designing your tests well, one of the most important parts of testing in production is sound data management. When running a test, you want to ensure that your real user data and your test data do not mix, otherwise both testing results and larger business analysis will become muddled.
To separate test user data and real user data when testing in production, it’s critical to have a system in place that makes it easy for you to identify test users and control how test user data flows throughout your data pipeline. Using the mParticle and Split bi-directional integration, it’s easy to gain granular control over how your test user data and real user data is collected from the production environment, understand your test results, and filter which data is forwarded to different destinations. First, the Split Feed integration allows you to send traffic impression data from tests to mParticle, where it can be tied to persistent user profiles. Next, the Split Event integration allows you to forward test user data to Split for rigorous statistical test analysis. As you connect customer data to the other systems in your data pipeline, you can use Filters to exclude test user data from being forwarded to any business analytics, data warehouse, and reporting tools.
To learn more about testing in production and how you can get started with Split and mParticle, watch this conversation on the topic between Talia Nassi, Developer Advocate at Split, and Melissa Benua, Director of Engineering at mParticle
To learn more about how mParticle makes it easier to manages data flows, you can explore our documentation here.
