Capture page navigation events in a React Application
In a single-page application, understanding which pages your customers visit and the journeys they take through your website can be challenging. Here, we’ll look at a scalable and maintainable strategy for tracking page navigation events in a React application.

Why track customer page views?
Page view tracking is one of the most important data points to capture when building a picture of how your customers interact with your site. Knowing which pages specific customers visit and how long they spend on each page allows you to eliminate blockers in common user flows, remarket to individual customers based on the content they view, and perform a wide variety of other user experience optimizations.
Websites that are not built with SPA architecture perform full HTTP request-response cycles each time a user navigates to a new different page, which makes implementing page view analytics relatively straightforward. Typically, in this type of “traditional” website, all it takes is placing a snippet of code in a <script> tag at the bottom of the document to tell analytics services when and for how long users visit specific pages. Since single-page applications use client-side rendering to handle page navigation dynamically, however, tracking page views can be slightly more complicated.
Since SPAs are now an extremely popular design choice for developing front-end interfaces, it is important for developers to understand how to maintain robust navigation analytics within this web architecture. Whether you’re building a new SPA-style interface or migrating an existing multi-page site to a client-side rendering model, your engineering team needs to have a scalable and maintainable strategy for handling page view tracking.
Let’s take a look at how to log navigation in an application built with React. We’ll use the same sample application from our previous post about SPAs, though now the simple furniture store homepage includes separate pages displaying tables, desks, chairs and lamps. The application now also uses React Router to handle page navigation which, if you’re not familiar, is a feature that allows developers to declaratively compose navigational components within a React application.
While the method for collecting navigation events we will explore can be used to send data to any third-party tool, in this example app, we will forward these customer events to mParticle––a Customer Data Platform that allows you to collect customer data once through secure APIs and SDKs and connect it to all of the tools in your stack.
Here is a look at the app’s UI:
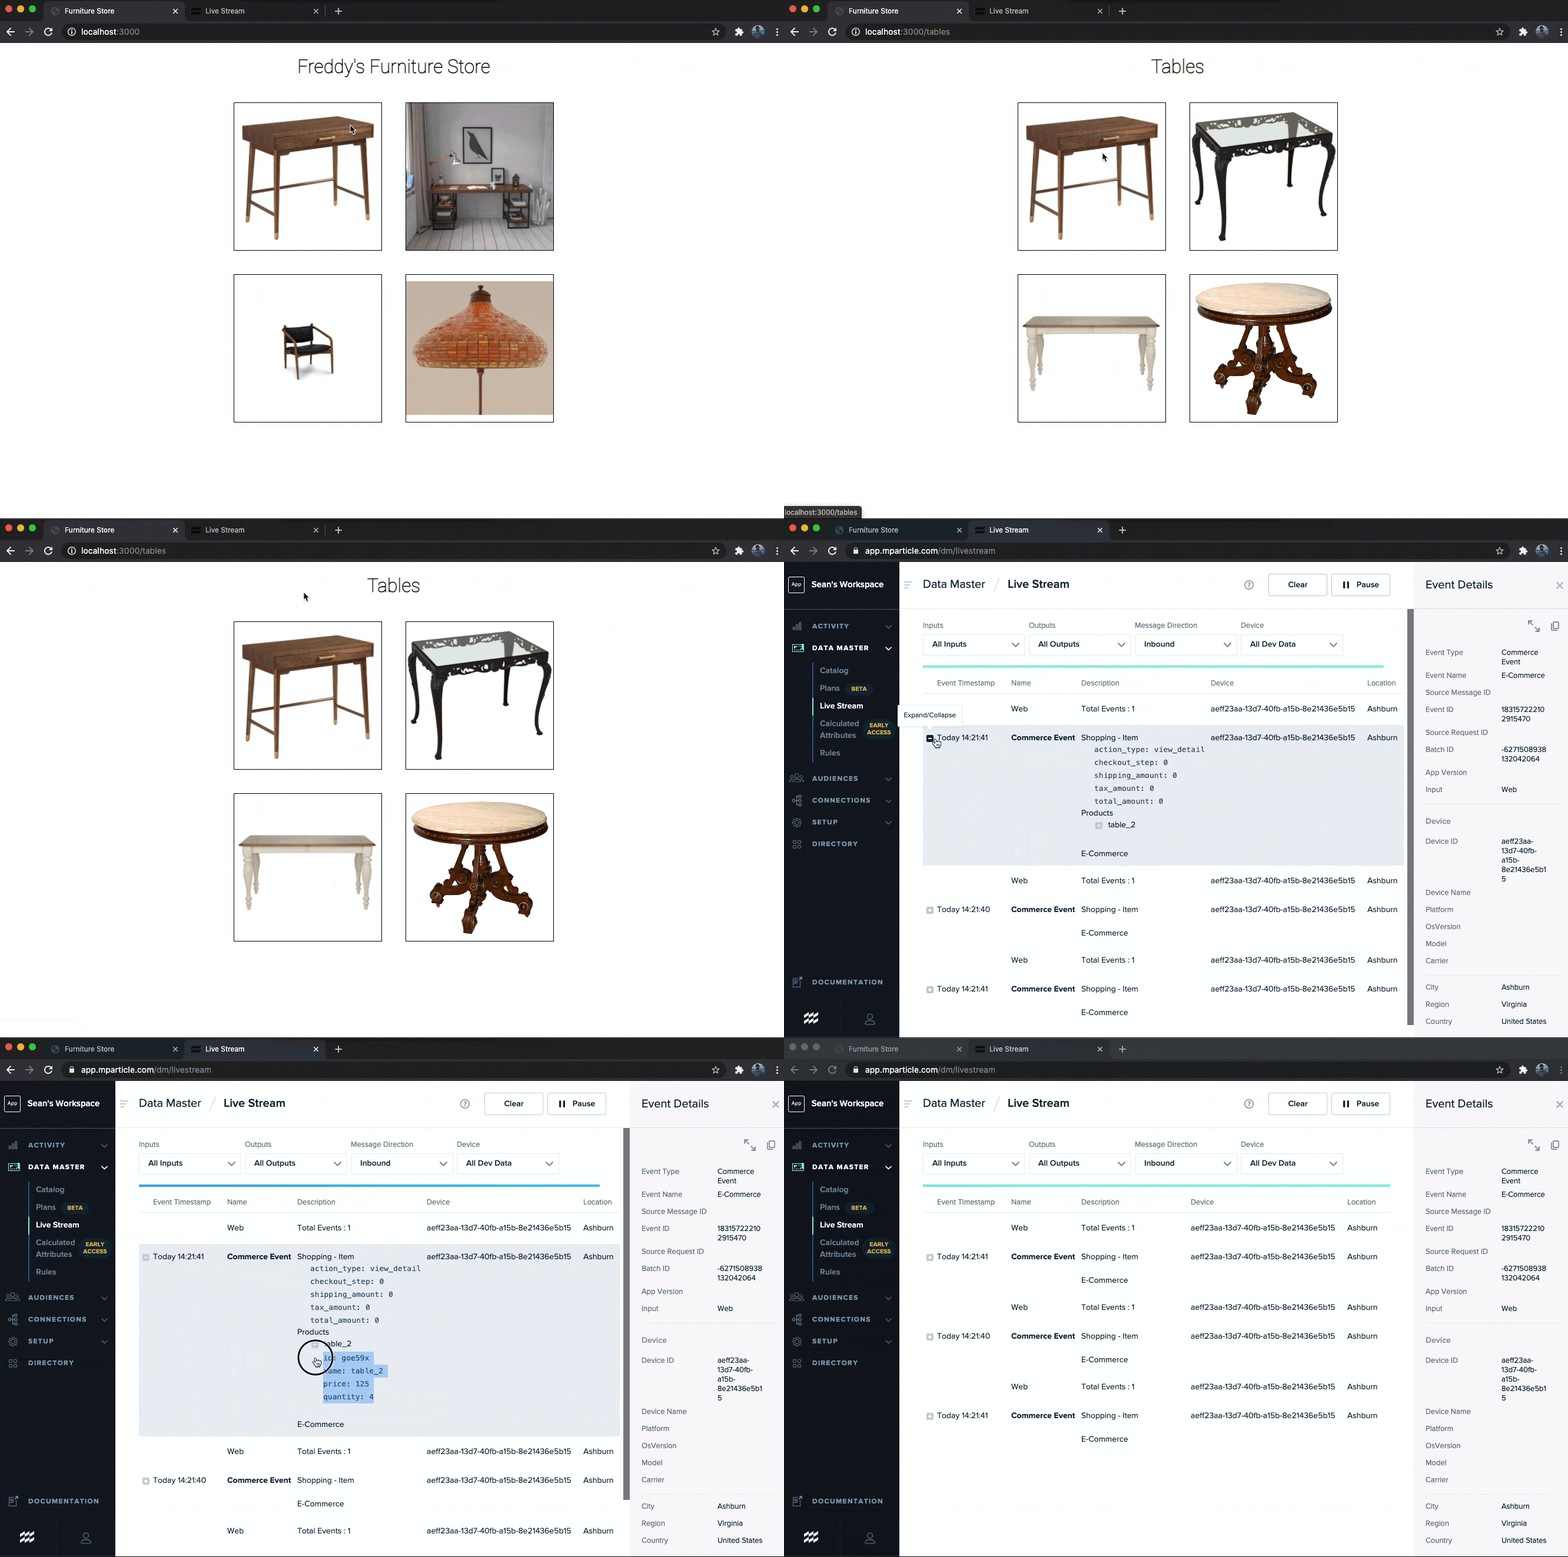
Demo: Capturing eCommerce events with mParticle in a React app
Firing analytics tracking with lifecycle hooks
As we can see, as in our last example, ViewDetail events are being sent to mParticle. When customers click on specific products, that product’s name, SKU, price and quantity are visible in the mParticle Live Stream. Now that we have separate pages in our application, however, we don’t just want to track the individual products our customers view. We would like to know which pages they visit, in what order, and how much time they spend on each page.
As we know, our React application is serving each page dynamically, so we cannot use page loads to trigger event tracking APIs. What we can do, however, is call the appropriate methods during the mount phase of the component lifecycle. Since we are using functional rather than class components in our application, we will pass our page tracking method as a callback function to the Effect Hook with useEffect(). Here’s what the component that renders our chairs page looks like with the addition of calling the logPageView method on mParticle’s web SDK:
Chairs.js:
function Chairs() {
  useEffect(()=> {
    window.mParticle.logPageView(
      "Chiars Page",
      {page: window.location.toString()}
    );
  }, [])

  return (
    <div>
      <h1 className="main-heading">Chairs</h1>
      <div className="product-image-container">
        {Object.keys(products.chairs).map(chair => {
          return (
            <Product
              backgroundImage={products.chairs[chair].image}
              productCategory="chairs"
              product={products.chairs[chair]}
            />
          );
        })}
      </div>
    </div>
  );
}

export default Chairs;
Streamline your website integrations
Learn which third-party integrations you could replace with a single SDK by adopting mParticle.

Notice that the mParticle logPageView method uses the location property on the window object to dynamically access the page URL via the browser. This is a good strategy to employ regardless of the location to which you are sending the data, as it helps make the API call more reusable and dynamic. Now, when we navigate to the chairs page in our app’s UI, we can see that this page view event is logged as a “Screen View” event in the mParticle Live Stream:
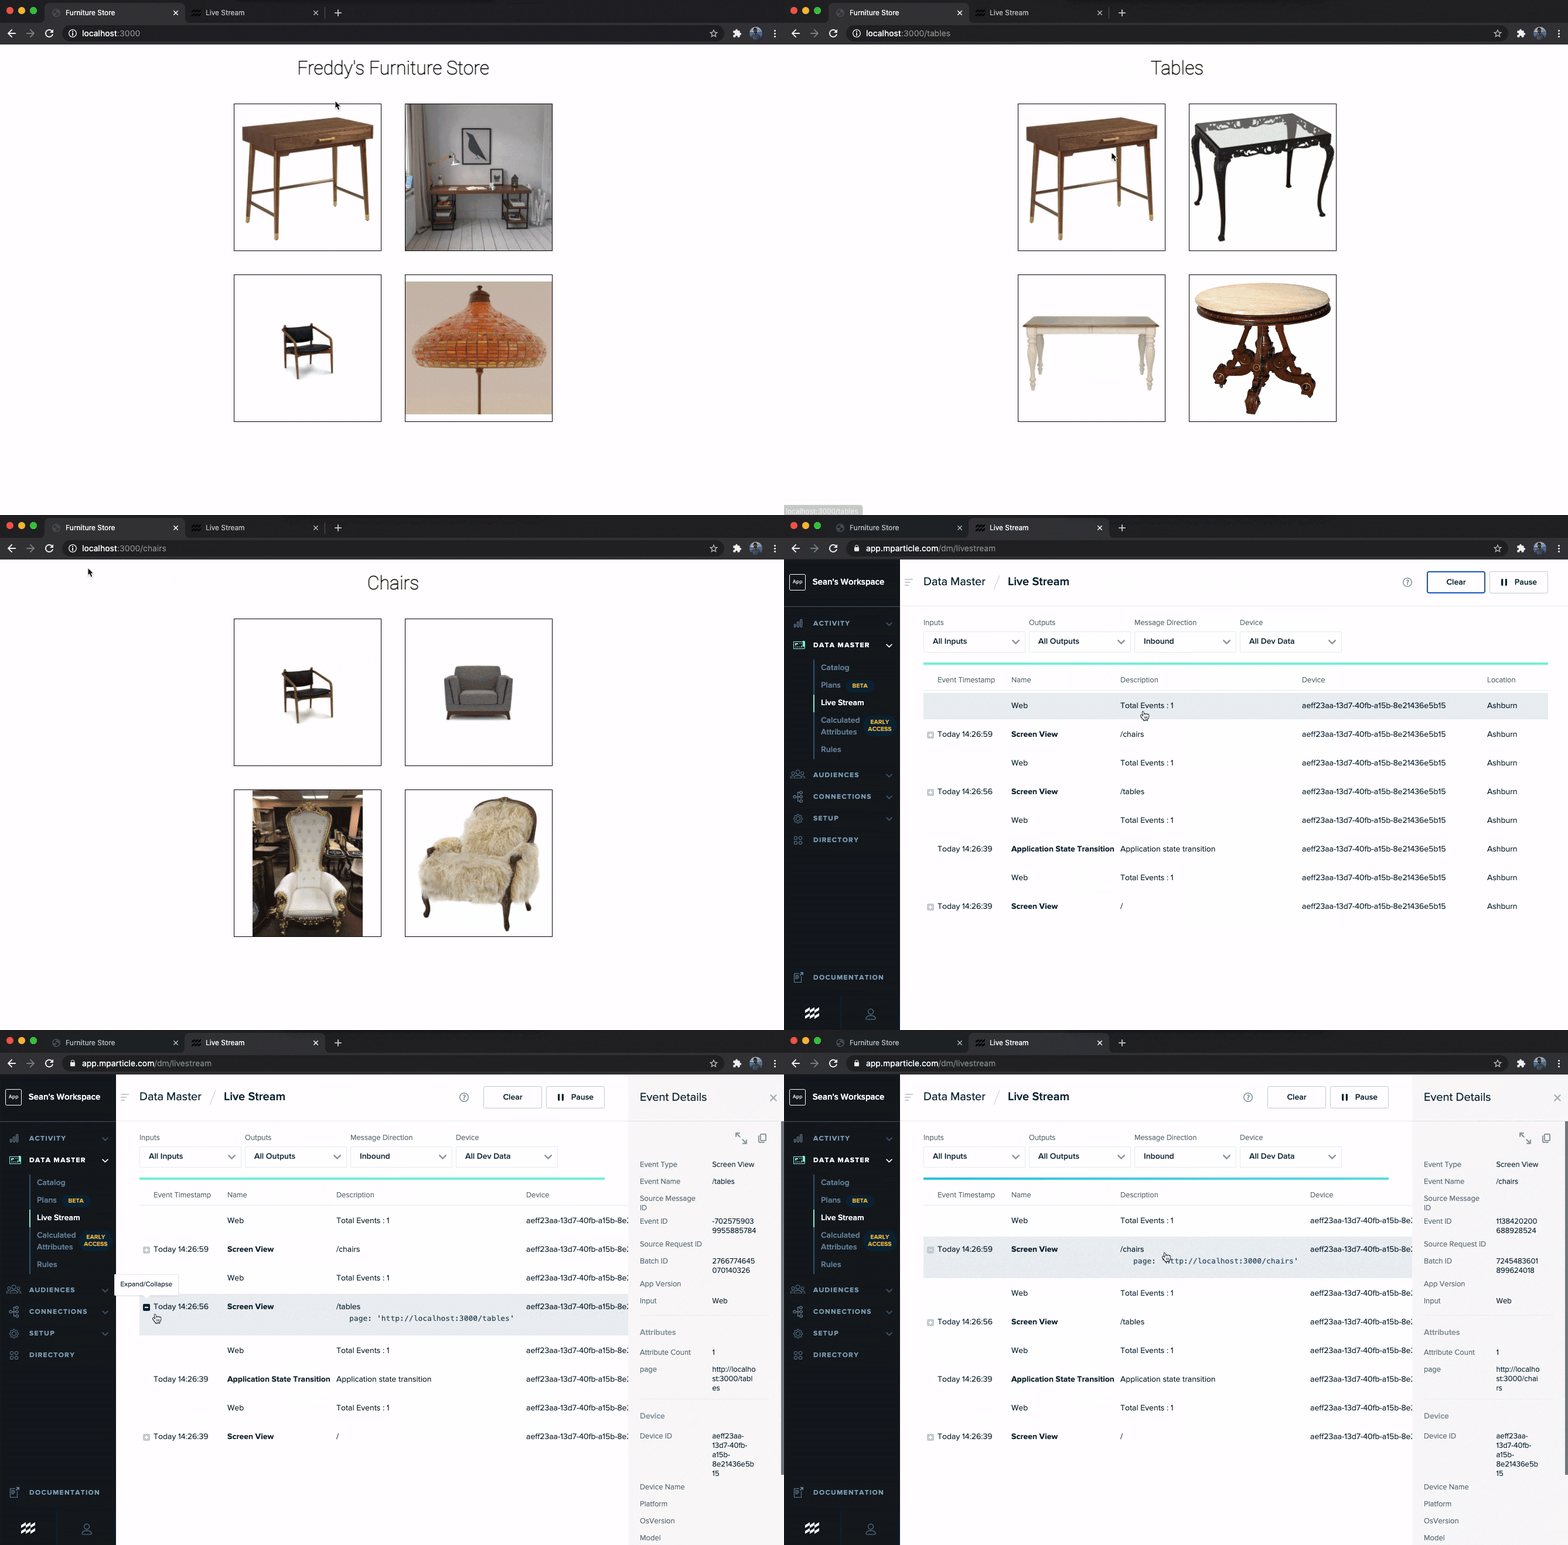
Demo: Sending page view events to mParticle from a React app
Making it scalable
This accomplishes what we want for the chairs page, and since we only have three more pages to track in our app at the moment, it wouldn’t be hard to replicate this code in each additional component. Though what happens when our furniture store grows, and our site includes dozens, if not hundreds more pages? It would not be optimal to require every developer on our team to remember to add this useEffect hook to each new page. Ideally, we would be able to implement the page view tracking once in our app, and not have to worry about it as we build out additional page components.
Luckily, by using React Router combined with the useHistory hook, we can do just this:
Routes.js
function Routes(props) {
  const history = useHistory();

  useEffect(() => {
    trackPageView();
    history.listen(trackPageView); // Track all subsequent pageviews
  }, [history]);

  function trackPageView() {
    window.mParticle.logPageView(`${window.location.pathname}`, {
      page: window.location.toString(),
    });
  }

  return (
    <Switch>
      <Route exact path="/" component={Home} />
      <Route exact path="/tables" component={Tables} />
      <Route exact path="/desks" component={Desks} />
      <Route exact path="/chairs" component={Chairs} />
      <Route exact path="/lamps" component={Lamps} />
    </Switch>
  );
}

export default Routes;
This is our Routes component, where we are mapping a specific path to each of the components that render our pages. At the top of this function, we create an instance of the “history object,” which is a dependency of React Router that provides a useful way to manage session history in a React application. Next, we move the API call we want to make on each page view into its own trackPageView helper function where we use window.location to dynamically pass the URL and page into the payload sent to mParticle. Finally, we add a call to useEffect, where we:
- Call trackPageView() to run the first time the component renders.
- Pass trackPageViews into the listen method on the history object to make sure every page view is tracked.
- Call the trackPageViews function inside of useEffect, and pass the history object to its dependency array specifying that useEffect should be called every time history is updated.
Now we are able to track page views across our application with a simple addition to our Routes component. We’re sticking to the principles of “DRY” programming by implementing functionality once and using it repeatedly, and we got around the challenge of tracking page views in an application that dynamically renders content in the browser.
Feel free to take a closer look at this sample application, and experiment with tracking more data and events in a React application.
Finally, a quick side note––useEffect() suffices for the purposes of capturing a page view event, since like its class component counterpart componentDidMount(), useEffect runs after the component mounts. However, it is important to understand that useEffect() is fired after the DOM elements have actually been rendered on the screen, whereas componentDidMount() runs before this occurs. This means that if you need to synchronously extract some data from the DOM, set state with this data, then build a new UI based on the state update, you will actually encounter a page flicker if you use useEffect() to trigger this sequence. In these instances, the useLayoutEffect() method will much more closely resemble the rendering behavior of componentDidMount().


